After a bit of an incident with some black PETG and the hard discovery that some PETG formulations will work with a PTFE-tube hotend but not others, I resorted to a printer upgrade. I figured it would be a relatively fast upgrade but it turned out that my printer was either fully out of commission or really unreliable for several weeks, which was not how I’d planned things.
SiliCon 2021, Crafty Sorceress and the flash grid of doom
The story starts with meeting up with Crafty Sorceress at SiliCon 2021. The entire reason why I went to the con was to see the new version of her LED lightsaber.
As part of this, I got some really neat flash shots that were completely within my style of photography but they were just… better. And so I resolved to find some stuff to up my portable lighting game.
Thus, I started looking into what I could do that would fit into my usual photo backpack that would add some flair to my lighting. One of the parts identified was a really nice photo grid that was designed for a Canon 580 but would probably fit my flash.
In order to do that, I decided I should be printing with black PETG, because the flash can get hot and PLA might not be the best of options… so I got a roll of Matter Hackers BUILD PETG in black… but then I discovered that it wasn’t printing right.
My non-all-metal PTFE-tube hot-end is really only good up to 240 by what I’d read on the Internet and that was fine for clear PETG but not black PETG.
The upgrade treadmill for Ender printers
I decided that I wanted to avoid the whole treadmill where a person buys a mildly improved piece of the puzzle, then a little better one, then a still better one, and eventually you have a pile of parts, each one a mild improvement, and get to the part you actually should have gotten in the first place.
I figured that if I just went to a clone-ish hot-end I’d end up with problems. One of the things that happens when you go to an all-metal hot-end is that the heat creep increases so you need to reduce the retraction rate in order to avoid jams… except that means that stringing increases as well, because everything’s connected.
So I figured I might as well make it more Prusa i3-like and go to direct drive at the same time, figuring that the reduction in retraction distance from direct drive would offset things.
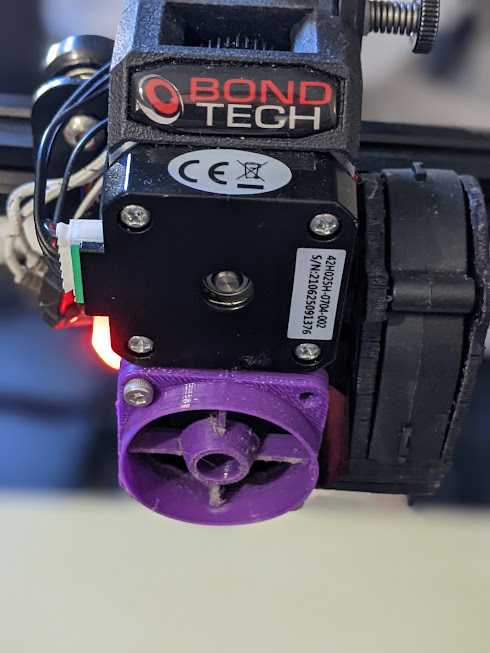
The Bondtech DDX comes in a nice pretty package for an Ender. That was a bit of a plus. They also are one of the better name-brands.
I was kinda wondering what the benefits of different hot-ends was and decided that, since I was going to get a hot-end anyway, I might as well go for the Mosquito hot end because, allegedly, it’s going to have less heat creep and also has the advantage of being sturdier to make nozzle changes easier.
I already had an upgraded 50W heater that I’d picked up so I’d have a spare, so I didn’t get yet another heater, and I figured I’d scavenge the thermistor from my existing printer, so I went to the Slice Engineering site and used their nifty configurator engine to get a DDX extruder, the adapter and the Mosquito, plus a 0.4mm and 0.6mm vanadium nozzle.
A bunch of things that went wrong and ate up time
The instructions provided by Bondtech for the DDX upgrade are, frankly, mediocre. I ended up having to read the instructions on the Bondtech page, the instructions on the Slice Engineering page, and then watching parts of a reasonable install video that contained a bunch of details that the Bondtech manual didn’t have, and I still needed to do some improvisation and investigation.
This is yet another symptom of one of the worst things about the 3D printer industry: Leaning on the community for free videos. For example, when I set up my Ender 3v2 in the first place, I needed to find a video because the manual wasn’t great, but that’s par for the course. [sighs in Ender] Having a fancy upgrade hotend and being in the same boat… not so good.
If I were to actually propose a solution, instead of griping, is that there needs to be a “general principles” meta-guide alongside the printer-specific guide, with things like a good exploded view with the parts called out with pointers for orienting and adjusting them right would be good, for example.
Other annoyances:
- The Ender 3 v2 is designed such that there’s an electronics box under the printer so you have to tilt the printer over, except that it also has enough protrusions that you can’t really tilt the printer on its side, so I ended up putting the printer on blocks, sorta, and then going at it from underneath. After I did this, somebody came up with a set of blocks that can be used to make this not a problem.
- It turns out that I’d had enough messy print failures that neither the heater nor the thermistor were coming out of the hot-block, so, arguably, I just should have gotten a thermistor as well right away. This is two self-inflicted errors in one. First, I should have just gotten a thermistor instead of trying to save twenty bucks and second, I didn’t check to realize that I still got the adapter for the stock extruder, so I should have probably done this halfses and put the extruder on first with the existing hot end before switching hot-ends.
- I got a cheap thermistor from Amazon because that was the fastest way to get a new thermistor but that turns out to be a bad idea. I’m not sure what exactly happened but I heard a pop sound and then the overheating protection alarm went off so I’d thought that it exploded but it seems like it just broke. Either way, I got a different one, this one the Partsbuilt 3d thermistor that already has the right cable and then it was fine.
- Their BLTouch mount is absolute shit and it doesn’t let me use the Ender’s mount, which I’ll expound on more in a bit.
- You have to upgrade the firmware, at least if you are using an Ender 3 v2. I couldn’t get the E-steps in the right range any other way. This also meant that I needed to upgrade the LCD firmware and that guide is also very vague about how to do that. The instructions to actually upgrade the display firmware are something like this:
- Procure a SD card. I just used the one that came with the hardware.
- Format a SD card as FAT32 with a 4096 byte allocation size. This is an important step.
- Drag the DWIN_SET directory onto the card from your computer
- Dismantle the LCD and put the SD card into the LCD screen’s SD card slot.
- Turn on the printer. The screen will display all-blue at first and then, once the firmware is actually installed, go orange. At which point you probably want to wait for a minute or two, just in case. If it goes straight to orange, you did something wrong.
- Remove the SD card from the screen, now you can do the firmware upgrade for the printer.
- I also screwed up while perpetually dismantling and reassembling things and let the little piece of bowden tube between the extruder and the hot-end fall out and didn’t notice, so it was a little weird until I figured that part out.
- I did an absolutely absurdly silly thing and somehow got my nozzles mixed up. So I was wondering why it was SO DAMN HARD to get things in calibration and it turns out that it was all because I had a 0.6 nozzle mounted and was trying to print as if I had a 0.4 nozzle mounted.
The correct BLTouch mount didn’t come out until after I needed it.
The entire time, Bondtech partnered with Slice Engineering such that I could go to the Mosquito store, select my printer, and get the suggested upgrade kit.
The DDX extruder has enough room for the Ender 3v2’s BLTouch bracket to live along side of it and the instructions suggest it’ll just work. However, it doesn’t just work, which seems to be specific to the Mosquito… however I purchased it from the Slice Engineering store. Thus I crashed my nozzle into the bed when I tried to use it.
I had printed the provided BLTouch adapter already, just in case it didn’t fit, so I tried that. At this point, there was only one provided BLTouch mount, the “DDX Universal BL Touch Mount” filename 10079-60_DDX_BL_Touch_Mount_Universal.STL. Except that’s not universal because I guess if I wasn’t using the Mosquito, I’d be able to use both screwholes on the DDX so that it’s actually maybe a stable mount, albeit one that’s still fiddly.
Thus, every so often I’d have to do a total re-calibration of things because the BLTouch had moved and when I did so, I’d also have to be super careful because it was only held on by one screw anyway.
After a while, I get curious and randomly look at the Bondtech website and lo and behold there’s a new BLTouch mount, the “DDX BLTouch Mount CR-10S Pro/V2/Max & Mosquito”, filename 10079-61_DDX_BLTouch_Mount_for_ProMosquito.STL. No Ender in the name, of course, but that one’s actually at least vaguely right.
So, while the folks at BondTech had the opportunity to design their own BLTouch mount however the heck they wanted and aren’t even including it in the box, it’s actually a pretty crappy way to mount BLTouch sensors.
Fans and mods
I’d procured a 5015 blower from th3d with the intention that at least some point, I’d install that. I figured it had the dual benefits of probably blowing the same amount of air as the prior blower with less noise as well as blowing more air for better cooling.
I had printed, before I started, a bracket for the 5015 fan that someone designed because, at that point in time, BondTech didn’t have a V3 version of a 5015 fan.
I’d also procured a much quieter 4020 hot-end cooling fan which I’d intended to install for a while but never really got around to it, but it’s actually a bit too powerful for the Mosquito’s needs. However, I was forced to install it anyway because it turns out that you really really need a cover in front of the hot-end cooling fan, which I learned by breaking most of the blades.
I ended up designing my own silly little fan cover. Pretty much everybody’s fan covers looked cool but were more mesh-like which meant that they made the quiet fan loud by creating turbulence in the air stream. There were a few promising looking ducts but they ended up blocking the screw holes.
There wasn’t a sock available at the time I purchased it, so I ran it without the sock, which wasn’t exactly optimal because the hot-end cooling fan that’s specced to be as good as the stock 4010 fan but quieter blows a decent amount of air and so it kept causing the thermal overload protection to kick in.
Which is fine until I got frustrated about the whole thing and put a piece of gaffer’s tape over the fan cover which worked until I managed to clog up the heatbreak tube and had to do that whole blob of maintenance.
I’d also picked up a Partsbuilt 3D silicone sock but didn’t install it until I screwed up my first heatbreak tube because it seems to be designed to go over the whole works, which meant that unless I cut away at it, I had to remove the heater and thermistor to put it on so after that excursion, I ended up just cutting away at the sock and that solved a bunch of problems.
Results and conclusion
I printed the flash grid of doom from my stock of black PETG!

Then I printed it out of Nylon. Except the nylon isn’t opaque enough so it doesn’t work.
My conclusions:
- When I re-calibrated everything I found out that PETG prints a lot better in the range above I was comfortable printing with the stock extruder. So the stock non-all-metal-extruder is officially marginal for PETG.
- Even though the Ender 3 v2 is the standard printer to apply zillions of mods to, it’s really not especially ergonomic to apply zillions of mods to.
- The Slice Mosquito, in spite of having basically zero printer-specific instructions, was not a problem. The machining looked fine, whatever magical coatings they put on the hot-end to make plastic peel off seem to work, and it prints nicely at high temperatures. Since I don’t have intermediate steps, I don’t know how different it is were I to have gotten some random bi-metallic or titanium heat break into my existing hot-end or other shenanigans.
- The DDX fails at being a premium part. The desired product was something that would be quick and easy to set up on my printer, understanding that if I got one of the general-purpose Bondtech extruders or a Orbiter that I’d have to assemble a bunch of parts off of Thingiverse and spend a bunch of time tinkering with it. In return, I’d be OK with the notion that if my Ender were to asplode and I were to decide to get a Voron kit or a Prusa that I’d have a useless extruder. However, the docs weren’t nearly as good as I’d have liked and the custom BLTouch mounting system a disaster.
- On the other hand, the actual BondTech extruder is pretty nice, although I’ve not yet tested my roll of Ninjaflex to know for sure. It was basically zero drama to print 95A TPU.
- The upgraded version of the firmware, which is basically an updated version of Marlin with the Jyers display firmware, is pretty darn nice.
- The only time I’ve had problems with the Mosquito hot-end clogging up was when I was doing something quite poorly considered and I think there’s one brand of extra-flexible TPU that specifically tells you not to use an all-metal-hotend, outside of that I see no reason not get a quality all-metal hot-end and never look back.
- The Ender 3v2’s single-Z axis is arguably not quite up to the task, so I end up pre-heating the bed because if I started from a cold bed, sometimes it would droop a bit when I started a print.