As I said last update, it feels like I’m reaching the end of the build?
I grabbed the manual and the remaining parts and was able to fairly quickly sort the remaining 3D printed parts into a few small ziploc bags.

Print bed
- In the absence of actual documentation, I’m going to assume that what I’m meant to do is to screw the thermal fuse to the bed with an M3x10 screw and use one of the “shim” washers that aren’t accurate enough for shimming the idlers and pulleys between the screw head and the thermal fuse.
- There’s kind of a wiring mess here and I’m not entirely sure where the bug lies. You cannot fit a 2 pin JST-XH connector through the cable chain, but both the Fabreeko and stock beds come with a JST-XH connector that’s been helpfully crimped, which means that either you are going to end up leaving a pair of wires dangling, or you have to improvise in one direction or another, either cutting-and-joining or crimping on a fresh connector. I’m not sure what the right “fix” is for this.
- I carefully sliced apart the Fabreeko cable protector without cutting any of the wires, then I cut the heated bed wires to the right length to hook them up to the Wago 221 terminal blocks that I had printed the Kirigami mount for myself because it didn’t come with the kit. And then I ended up cutting off the JST-XH connector for the bed and I’ll probably just crimp on a fresh connector later.
- Not as part of the manual but I grabbed the multimeter to make sure that the heater connectors were connected. The Fabreeko wires seem to be roughly 18ga wires when I was stripping them. Also, Wago 221 connectors, the little lever-flip connectors that are popular these days, do not require you to use a ferrule.
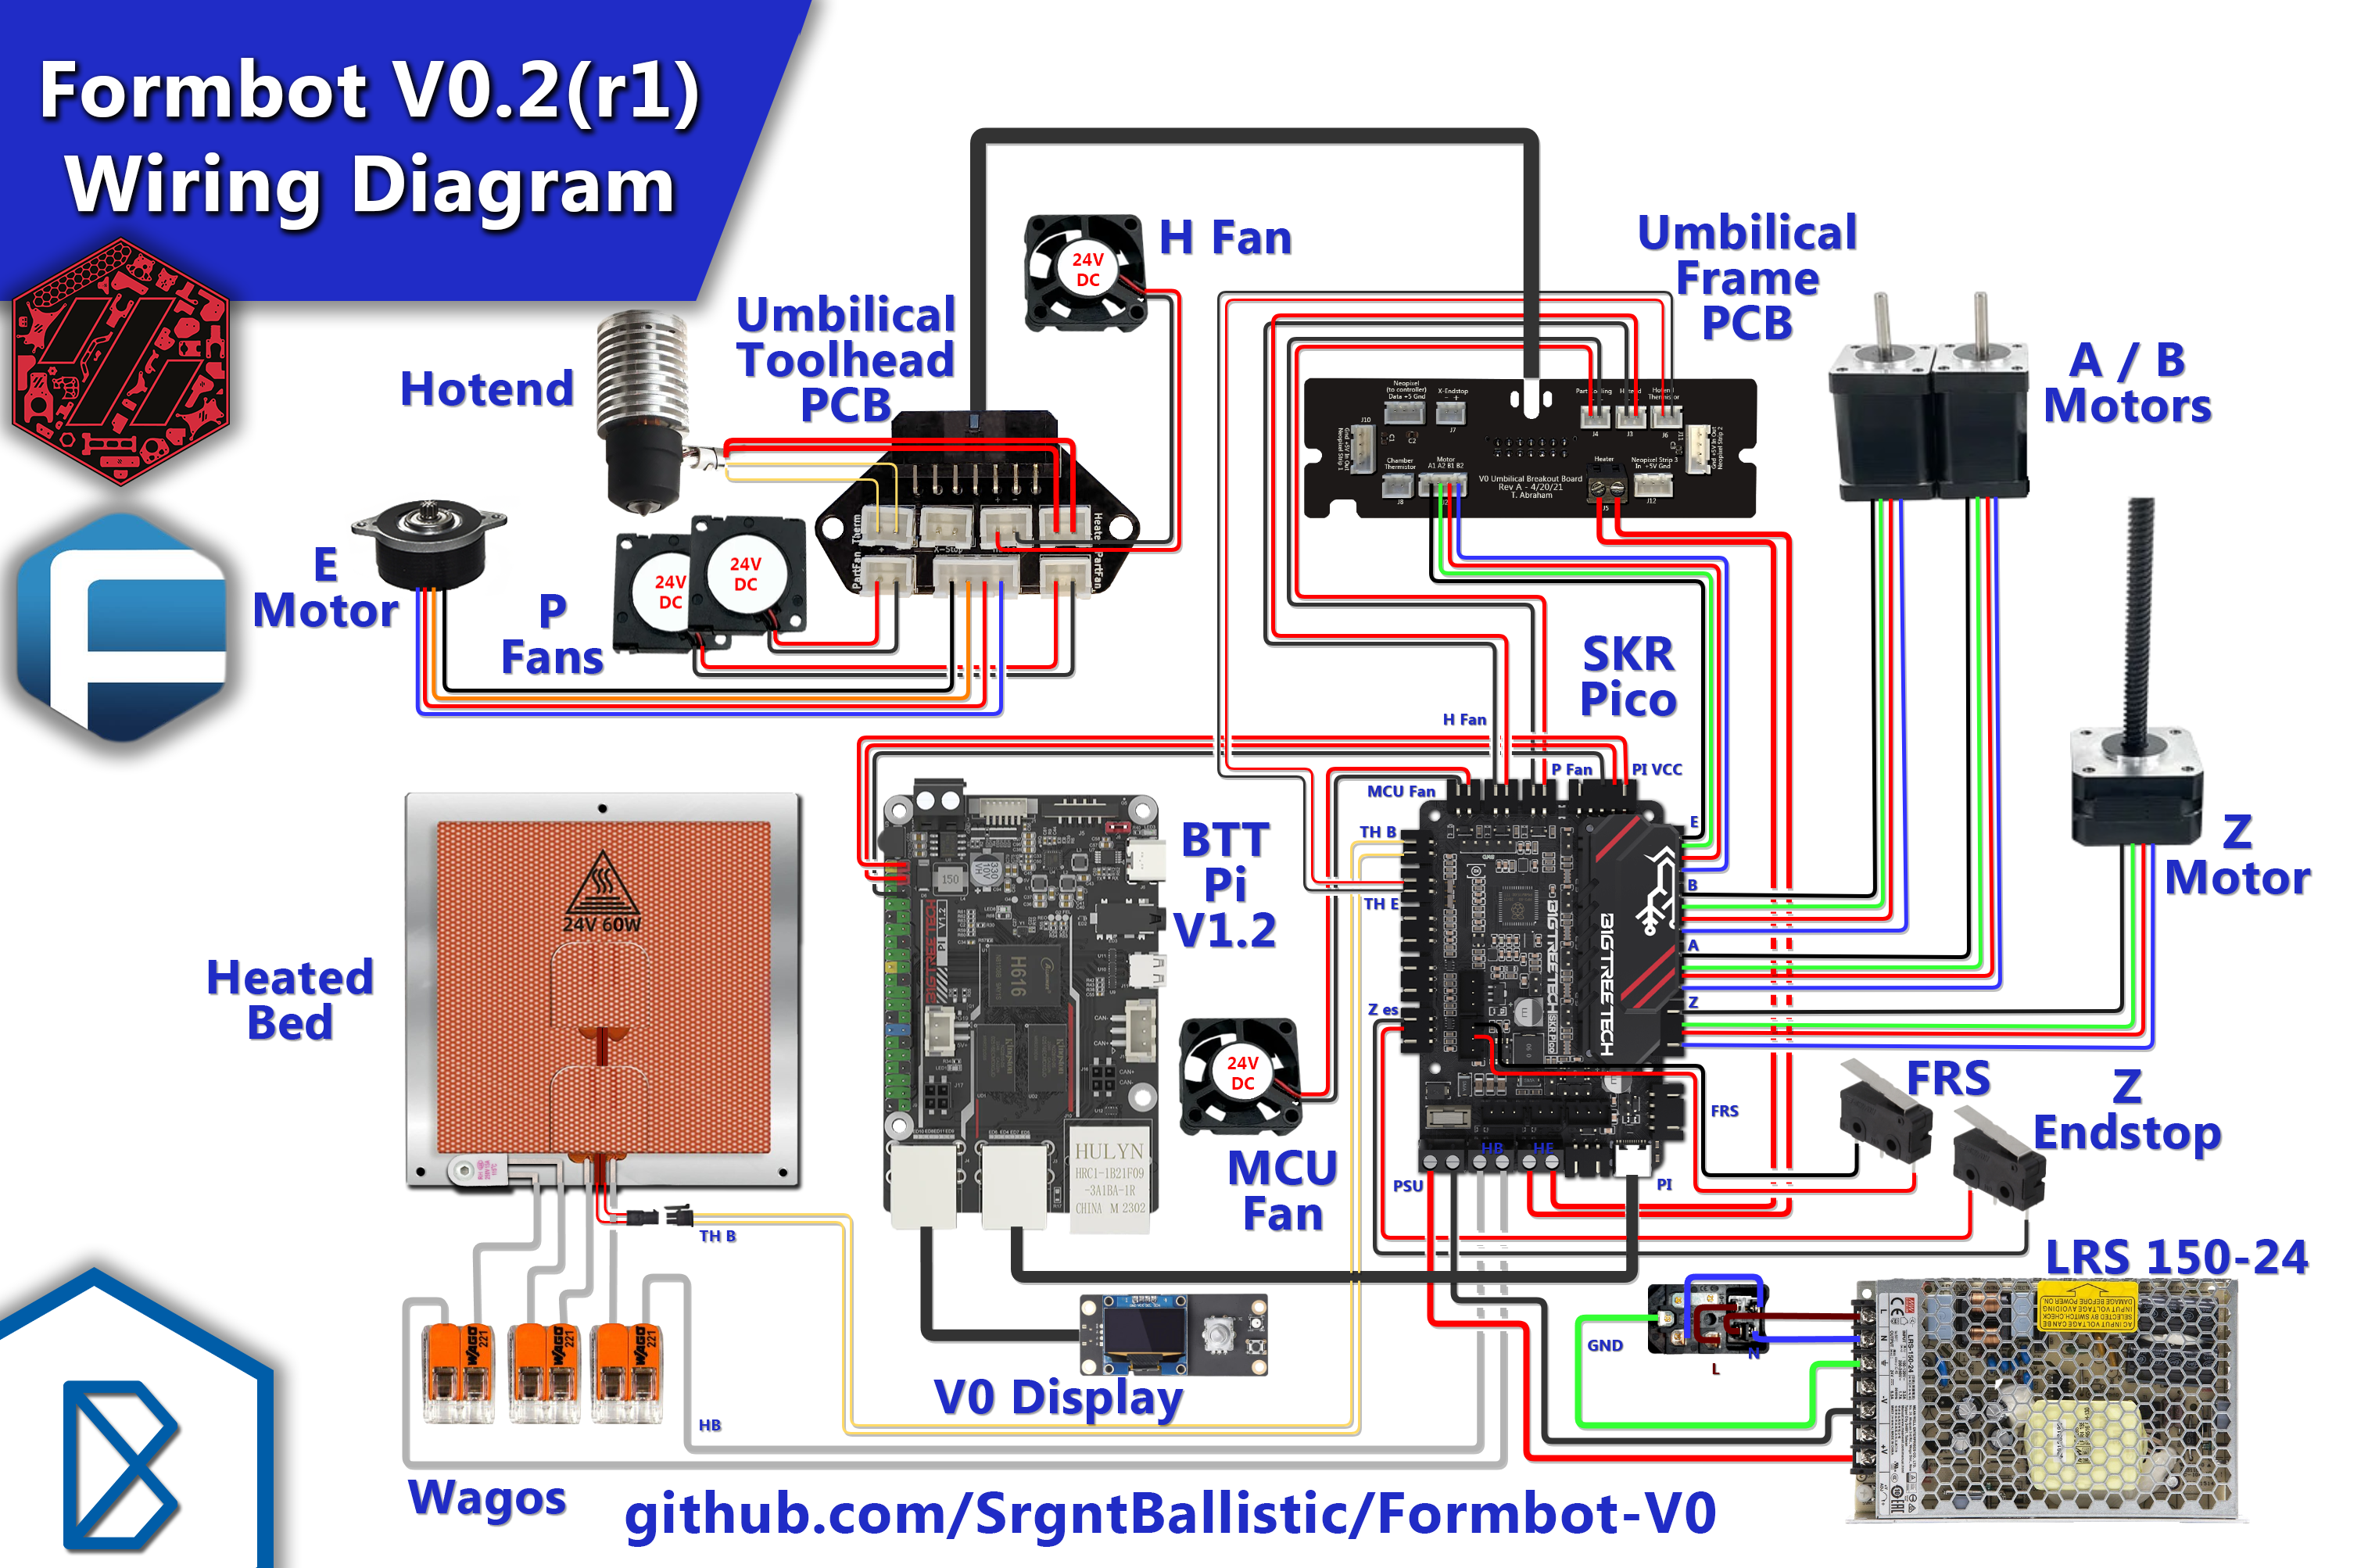
- SrgntBallistic’s wiring diagram comes in handy here as I’m contending with snipping wires and constructing things.
- SrgntBallistic noticed that the position of the Formbot bed has mechanical interference with the Kirigami bed. I don’t think this has been fixed on the bed I’ve got, even if most of the other problems have been fixed.
- I am definitely going to have to print the massive nuts mod or the snow knob mod because the stock knobs are way too small.
Print head
- I am not sure what lube is suitable for the MR85 bearings in the extruder so I’m just going to put in the same SuperLube that I used on the rails.
- When it comes to glues, I guess you could say that I’m not really much of an adherent. I generally design things to not need glues, especially superglue. Naturally this means that the superglue that had been sitting around that was described as not being like the other superglues is all dried out, before I’d ever gotten around to opening it up and trying it out, which meant I needed to get a fresh tube real quick. Would Epoxy have worked? No idea.
- I did have to sand a bit off of the metal gear shaft in order to get things to fit properly.
- When I was screwing around in Step 5 trying to figure out what I was supposed to do about the M85 bearing, I opened the container with the drive gears, which required me to peel off the tape holding it shut. Naturally, in between then and now, it managed to pop open and spew it’s contents and so I had to do some very careful digging to find a few bits. The magnets for the door were true bros in this case because that’s where the M85 and grub screw were but the little plastic washer thing was not magnetic and required a bit of a search.
- I realized that I only got one 3010 24v blower fan and I should have gotten a second one. So I ended up using a genuine gdstime fan for the hot-end cooling fan and used the stock blowers. My impression is that I’m going to want to upgrade to the DragonBurner relatively quickly and that one uses 4010 blowers.
- Manual writing is hard. For example, there’s a part where the manual talks about why you need a M3x10 screw so that it’ll have extra thread on the back side and two screw holes are slotted so you can adjust the backlash. In order to do this right, you’ll probably need to understand a bit of the why, even if the rest of the why is what makes a mechanical engineering education.
- I ordered my kit with a Phaetus Dragon ST hot-end because I really really like one-handed nozzle tightening. And when I started trying to assemble it, I realized that the Dragon ST that I was looking at had the kinda unfortunate E3D V6 style mount that I think even Sanjay felt bad about in retrospect and was about to flip out because the provided hotend mount was not designed for the V6 style mount… and then I realized that I could just unscrew the V6 mount adapter and everything was fine.
- BOM and/or sourcing issue: The BOM calls for M2.5x12 screws to mount a Dragon and there are none provided. I used some M2.5x12 screws I already had, except that the screws were too long. So I switched to the M2.5x8 screws provided and those fit perfectly. The error is either that the Dragon’s mounting screw depth changed, the screws were wrong all along, or the depth of the screw holes changed. Unclear.
- SrgntBallistic got a 104NT-4-R025H42G thermistor for his hot-end but mine came with a generic 3950. I’ve got an extra higher-temperature handy, thankfully, so I’ll use that instead.
- There were some folks who found that their umbilical breakout boards were mis-wired with the molex connector in the wrong orientation. Mine seems to be fine. One thing to note is that the polarity of the fans is labeled… however the input fan connector has the opposite orientation to the output fan connector.
- The manual doesn’t state but it’s generally understood that you want to use the 2mm inner diameter teflon tube for the hot-end’s teflon tube.
Getting started on the software side of the fence
I have various issues with Raspberry Pi the company. The Raspberry Pi started out with this vague goal to re-create the experience of the BBC Micro in the UK, but over time they split it into the foundation and the company… and so there’s no hero companies with capitalism… but then there was that thing where in spite of spending a lot of time talking about helping underprivileged groups of people they then proceed to hire an ex-cop for vague thought-leadering things and then also went on to defend this decision because I guess they thought that UK cops are somehow better than US cops, etc.
Also, they’ve had some catastrophically silly design flaws with the USB spec.
On the other hand, you want a Pi-shaped object to run klipper on and interface with the printer’s microcontroller side and the easiest option seems to be a genuine Pi because I trust the Pi OS’s longevity over the rest of the similarly-sized objects, so I’m not going to use that instead of the included Pi-shaped device because it makes my life easier if it’s identical to my other devices.
Likewise, it comes with a Sandisk branded MicroSD card. I don’t, in general, trust Sandisk cards right now after a very fancy and very genuine Sandisk card for my camera started acting up. Thus, I got a Samsung high endurance MicroSD card instead.
So, the first step is to download the Raspberry Pi Imager, tell it I’ve got a Pi 4, pick the 64 bit Raspberry Pi OS, and then when it asks me if I want to add some settings, I filled in my Wifi SSID, set my account name and password, and turned on SSH, at which point I can make Ansible do the rest of the work.
Summary

I’m assuming that the MiniSB is probably one of the trickier bits of assembly with all of the interlocking parts. There’s a lot of stuff where, had I built a blanket fort around a not-well-calibrated printer, I could probably print some ABS parts and they’d probably have some elephant’s foot and roughness and whatnot but they’d mostly fit together, maybe with some sanding and forcing.
The MiniSB is a different matter entirely. All of the work on putting in heat-set inserts into relatively simple parts paid off because now you have some fairly dicey inserts to insert. And a bunch of stuff needs to fit together fairly perfectly, etc.
On the other hand, I’m not sure about how well the MiniSB is going to work out for me long-term. Okay, so it looks cute. And if you look at the cost of a Bondtech gear kit or a cheap clone gear kit, you can kinda feel like it’s still good for self-sourcing to go back to the least expensive parts and not require a person to purchase a fancier extruder. And so on. There’s a bunch of design concerns that may not apply to me.
Mostly I’m annoyed because, compared to the Bondtech DDX on my Ender 3v2, the DDX has the main gear positioned such that I can jog it back and forth to load and unload filament manually. And the tension knob seems to be kinda dicey, although I’m not sure what would happen if I were to replace it with a genuine Bondtech knob since I don’t think I have a genuine set of gears. But it’s fine… this is a Voron.
I’m reaching the end of the build, I guess. Which is good, because my Ender 3v2’s acting up and I know what to do, I’ve even got the parts. On the other hand, if I’m going to spend a bunch of time hunched over a 3D printer, I’d rather it be the new one, not the old one. We’ll see how this goes…